The Android Package Kit (APK) is the format used to install and distribute apps and games on the Android platform. Chromebooks, running on Chrome OS, do not natively support APK files.
However, with a few simple tweaks, you can easily install APKs on your Chromebook and expand your access to a vast array of apps and games.
Here’s a comprehensive guide on how to install APK files on your Chromebook, before we start, let’s learn:
Are All APKs Compatible With Chromebooks?
No, not all APKs are compatible with Chromebooks. While the majority of apps available on the Google Play Store are compatible with Chromebooks, some APKs may experience compatibility issues when installed on these devices.
To ensure a smooth APK installation experience, it is recommended to check if the desired app is available on the Google Play Store.
If the app is not available, it can be obtained from a trusted source such as ApkPure, and manually installed. This process will be covered in detail in this article.
Method #1: Installing APK on Chromebook Using Google Play Store
- Ensure your Chromebook is compatible to run Google Play Store. Learn More!
- Turn on your Chromebook and sign in.
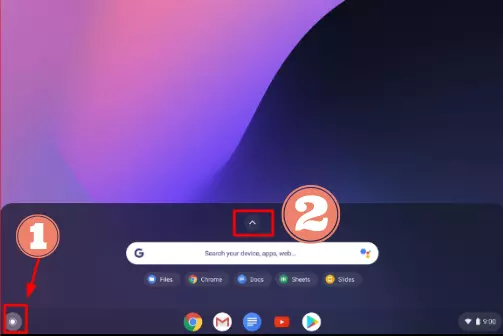
- Open the Google Play Store app by Clicking the launcher icon and selecting the up arrow.
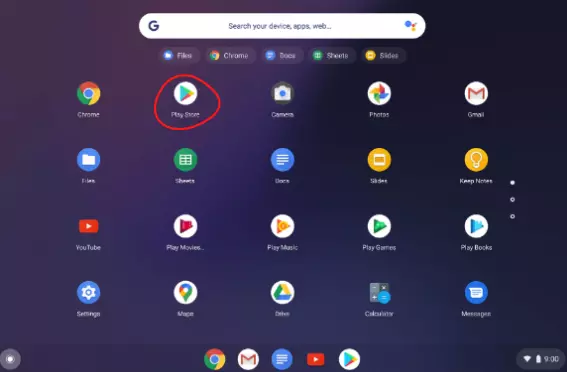
- Select Playstore from the list.
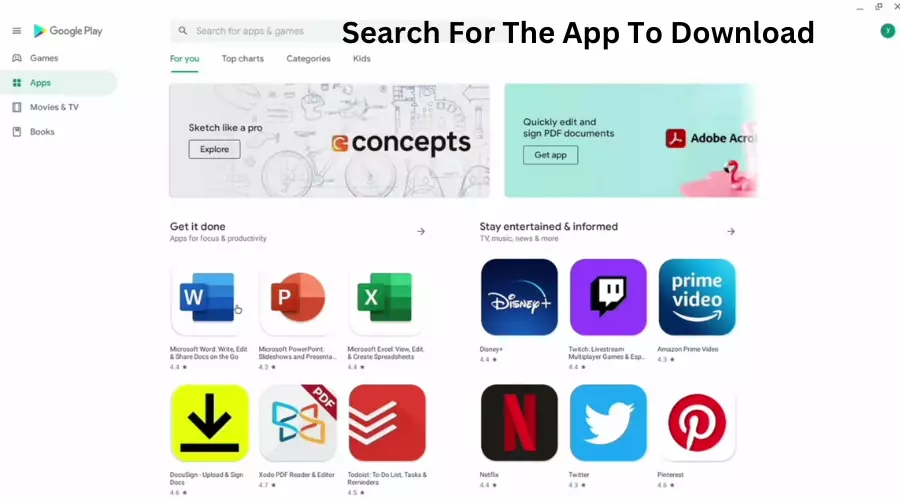
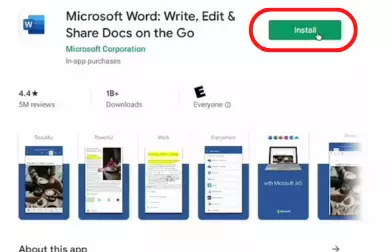
- Search for the desired app.
- Click “Install” to download and install the app. Wait for the installation to complete.
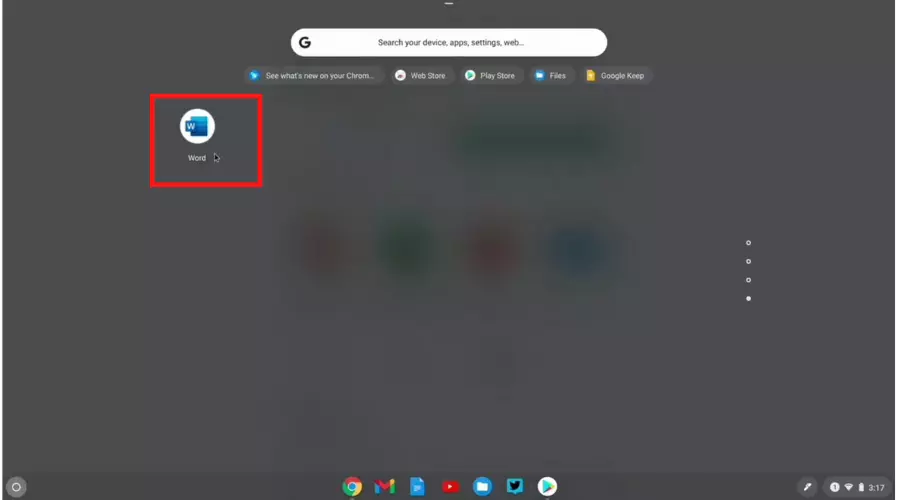
- Launch the app from the App Launcher. And you are done!
Not all APKs are suitable for Chromebooks, as compatibility issues may prevent some APKs from functioning optimally on this platform.
Nevertheless, most Google Play Store apps are compatible with Chromebooks, ensuring a seamless experience.
If you wish to install an APK that’s not available on the Play Store, you can easily obtain it from a reliable source such as ApkPure, and then proceed with manual installation. Let’s do this!
Method #2 How To Install APK Files On Chromebook WITHOUT Developer Mode
Accessing the deeper layers of a Chromebook’s operating system and installing a custom APK becomes possible through Developer Mode. This feature enables you to install APK files and other non-Google Play applications by unlocking the underlying OS.
However, it’s crucial to understand that enabling Developer Mode may pose a security risk and impact the stability of the device. Additionally, enabling this mode may result in loss of data.
That’s why I’m going to teach you How To Install APK On Chromebook without developer mode so that you won’t lose any data and also install your preferred APK.
To get started, follow the below steps.
Step-1 Enable Linux Mode On Chromebook
- Navigate to the Settings on your Chromebook. You can do this by clicking the Menu key and typing “Settings” in the search box, then pressing Enter.
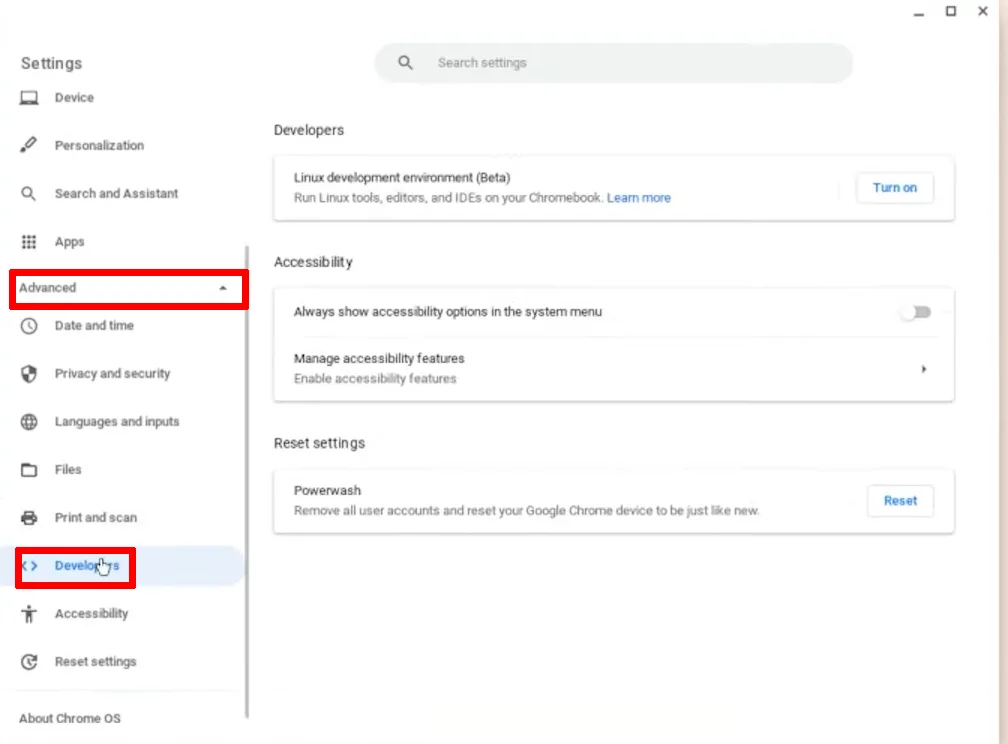
- Scroll down and select “Developers” under the Advanced section.
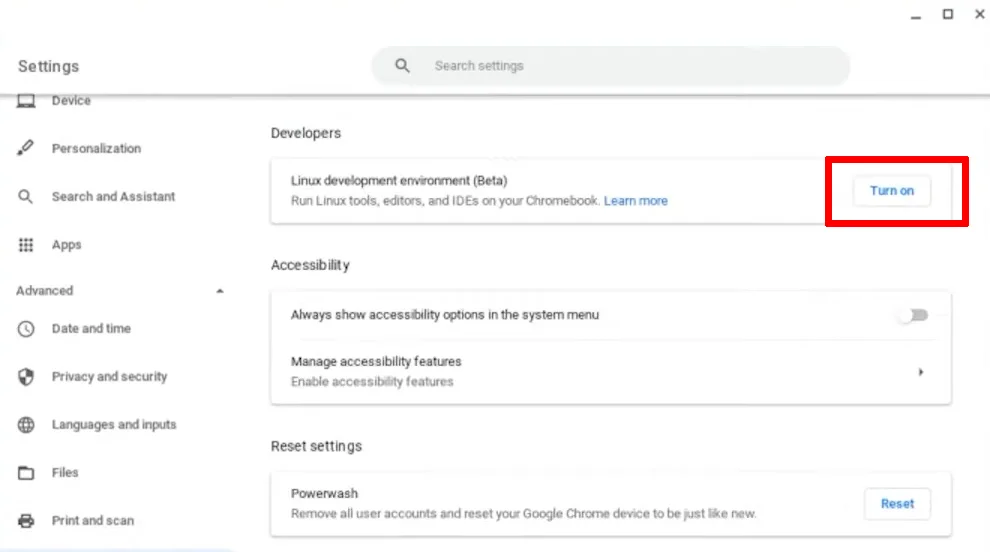
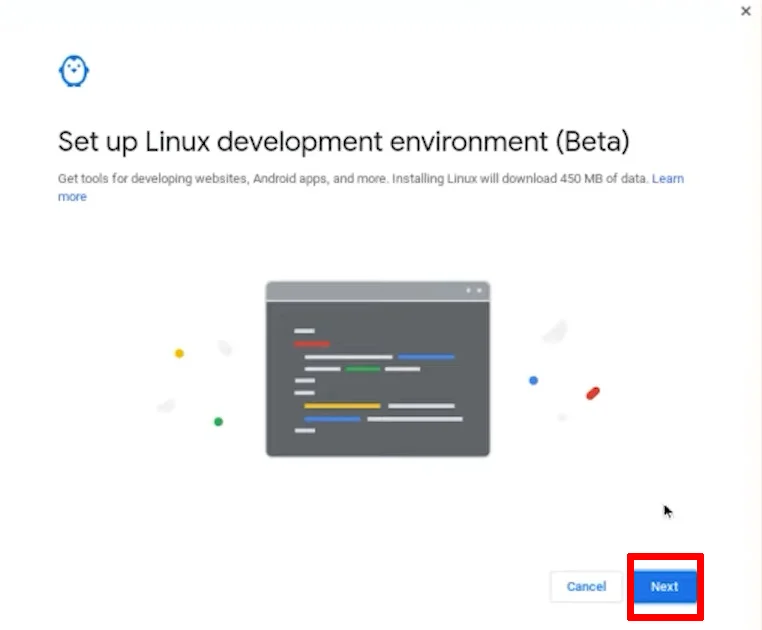
- Click the “Turn On” button next to “Linux Development Environment (Beta)”.
- Press “Next”.
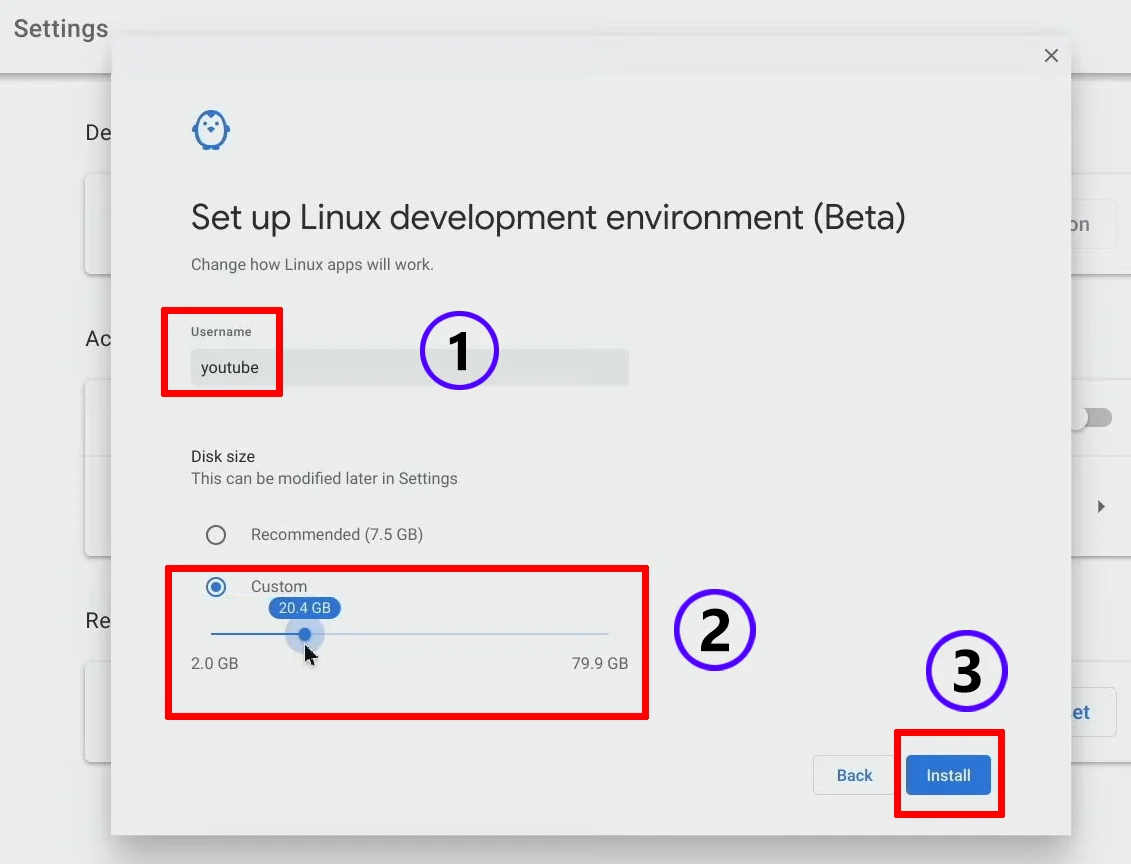
- Specify your preferred username and disk size. If you want to allocate a custom size, choose the “Custom” option and enter the desired amount. As an example, we’ll choose 20 GB, which should be sufficient for most APK installations. After that, Click “Install”.
- After installation, a terminal window will open, signaling that the Linux mode has been successfully enabled on your Chromebook and you can now install APKs.
Step-2 Install APK After Enabling Linux Mode
- Navigate to the Settings of your Chromebook. To do so, hit the Menu key and type “Settings” in the search box, then press enter. You can also click the Time (Clock) at the bottom right corner of your chrome > Select Settings (gear icon).
- Click “Advance” and scroll down to the “Developers” section.
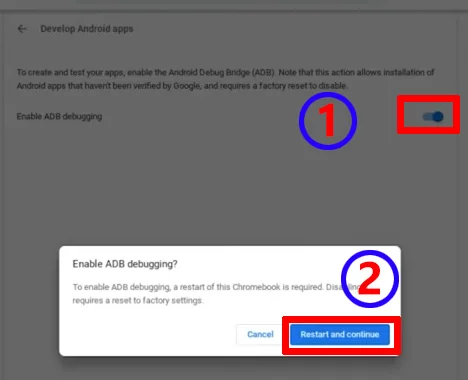
- Click “Linux Development Environment (Beta)” and then select “Develop Android Apps.”
- Turn on “Enable ADB Debugging.” A prompt to restart your device will appear, click “Restart and Continue” to proceed.
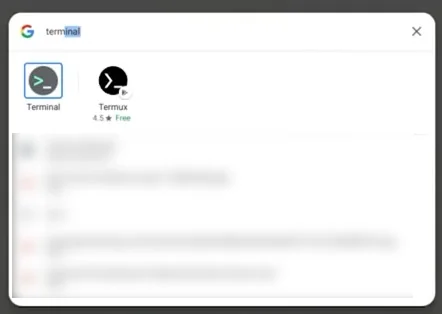
- Once your Chromebook has restarted, open the Terminal by hitting the Menu key and searching for “Terminal.”
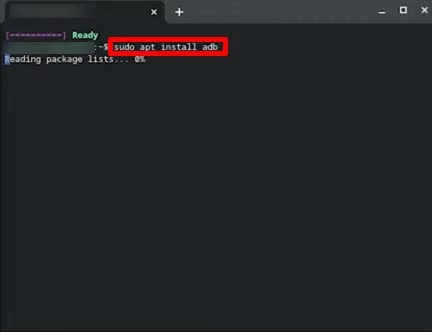
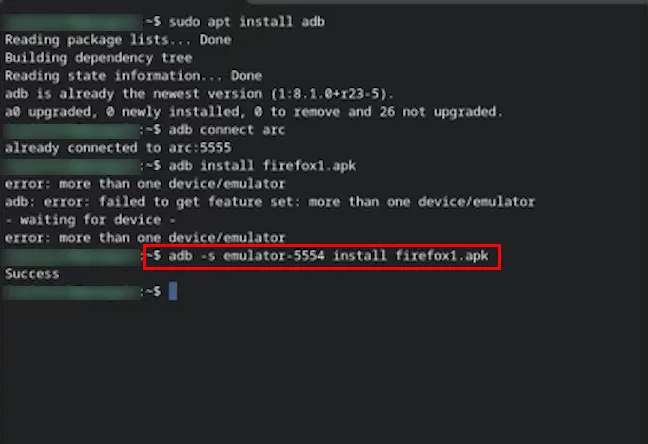
- Enter the following command in the Terminal: “sudo apt install adb” without double quotes.
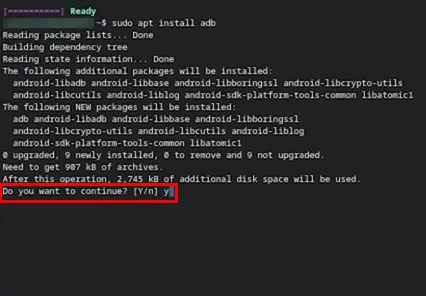
- If it asks “Do you want to continue? [y/n]” type “y” and press enter to confirm the installation.
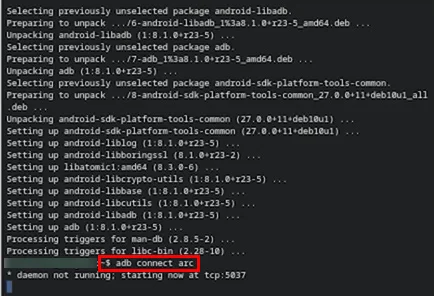
- Enter the second command on your terminal: “adb connect arc”
- Download the APK file from a trusted source such as APKpure to ensure the safety and security of your device. Downloading from untrusted sources may pose a risk and potentially harm your device.
- Once the APK file has been downloaded, locate it by clicking “Show In Folder.” If it cannot be found, it is typically saved in the download folder. If necessary, rename it to a more recognizable name.
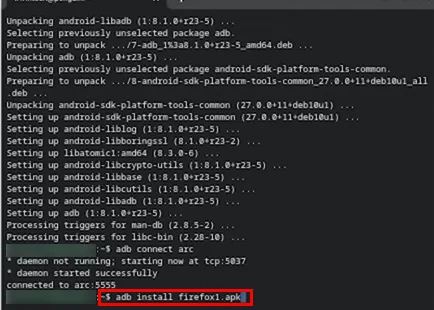
- In the Terminal, enter the following command: “adb install [file name]” (replace “[file name]” with the name of your APK file). Make sure to include the full file name, including the ‘.apk’ extension, when entering the command. If you encounter an error indicating that the file does not exist, you can try typing the “adb install” command in the terminal and then dragging and dropping the APK file into the terminal. This should also work.
- If you receive an error message such as “error: more than one device/emulator,” run the following command: “adb -s emulator -5544 install [file name]” (replace “[file name]” with the name of your APK file).
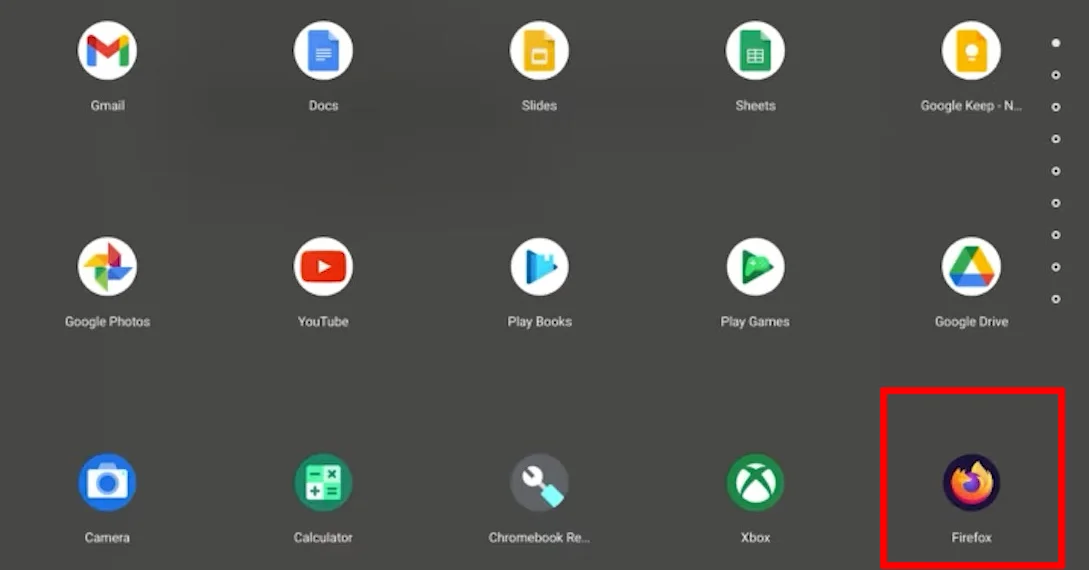
- Once the installation is successful, close the Terminal and access the newly installed app from the main menu of your Chromebook.
Method #3: Install an APK File on Chromebook With Developer Mode – Not Recommended
Before attempting to install APK files on your Chromebook, it’s important to note that you’ll need to have developer mode enabled.
However, if you prefer not to enable developer mode, you can utilize Method #2.
Step 1: Enable Developer Mode
Important: Back up your data! Before you proceed to enable developer mode, you MUST back up all your data, files, and apps on your Chromebook, as this process will erase all data on the device.
\However, we can also Install APKs without enabling the Developer Mode which I outlined in Method #2 please jump into that if you don’t want to lose any data. Also, We don’t recommend trying this on a school Chromebook.
- Make sure that you have enough charge in your Chromebook, if not plug in the power cord.
- Turn off your Chromebook completely by holding the power button until it turns off.
- Press and hold the Esc + Refresh (F3) keys and then the power button simultaneously to turn on your Chromebook.
- After your Chromebook has restarted, you’ll be greeted by a warning screen saying “Chrome OS is missing or damaged”. Press Ctrl + D to proceed to developer mode.
- You will see a message asking to turn OS verification OFF, press Enter.
- Your Chromebook will take a few minutes to fully enter developer mode. During this time, you may notice the device wiping all of your data and reinstalling a fresh copy of Chrome OS.
- Your Chromebook will restart and display a message saying “OS verification is OFF”, which means your Chromebook is now in Developer Mode. Press Ctrl+D and wait for the Chromebook to restart.
- Some older Chromebook might display “Your System is transitioning to Developer Mode…” Wait for it to complete the process. If you are again greeted with “OS Verification is OFF” you should again Press Ctrl+D and this time your device should restart normally.
- After your Chromebook has finished the process, you’ll be presented with the normal Chrome OS login screen. Click Let’s Go and set up your Chromebook by connecting to your WiFi and Logging in to your account as usual.
Now every single time you turn on your Chromebook, you will be presented with “OS Verification is OFF”, so you will need to press Ctrl+D to boot up the Chromebook.
Once you have enabled developer mode on your Chromebook, you can download APK files from the web and then install them. Keep in mind that downloading APK files from untrusted sources can be dangerous and may harm your device. So follow step-2 on how to install APK using the safe way.
Step-2: Installing APK After Enabling Developer Mode
Now that you have enabled the developer mode, let’s install the APK you want.
- Go to Apkpure.com and search for the file you want to install. I’ll download Pubg for demonstration.
- Type the Apk name in the search box and hit enter.
- Click the file name
- Click Download Apk
- Click Download XAPK (FileSize) and your file will start to download.
- Once your file is downloaded, click on it. And then click Continue.
- Finally, click Install. This will install the APK file on your Chromebook. You can open your file and enjoy it!
Wrapping Up!
You have now learned the various ways of installing APK files on your Chromebook.
You have the option to use the Google Play Store to directly download and install APK files, or you can enable Developer Mode to access more powerful features.
However, this method comes with the risk of losing data while transitioning to Developer Mode.
A safer alternative would be to use the Linux environment and install APK files using the Android Debug Bridge (ADB) and run a few commands on the Linux terminal.
Each method comes with its own pros and cons, so it’s important for you to weigh the benefits and risks before making a decision.
Ultimately, the method you choose will depend on your personal preferences and the level of risk you are willing to accept.
Whichever method you choose, make sure to only download APK files from trusted sources to protect your device from potential harm.


